Whirlybirds, innovative rooftop ventilation devices, considerably enhance home ventilation by improving air circulation and reducing heat buildup in attics. These wind-driven turbines create a low-pressure area, drawing hot air out while allowing cooler air to enter through soffit vents. Available in various materials like aluminium and galvanized steel, Whirly Birds offers energy-efficient solutions for different roof types and climates.
Proper installation near the roof ridge line, typically one unit per 50-70 square meters, maximizes their effectiveness. Regular maintenance guarantees peak performance and longevity. While initial costs vary, long-term energy savings often outweigh the investment.
Understanding the details of choosing and placing whirlybirds can significantly improve your home’s comfort and efficiency.
What Are Whirly Birds?
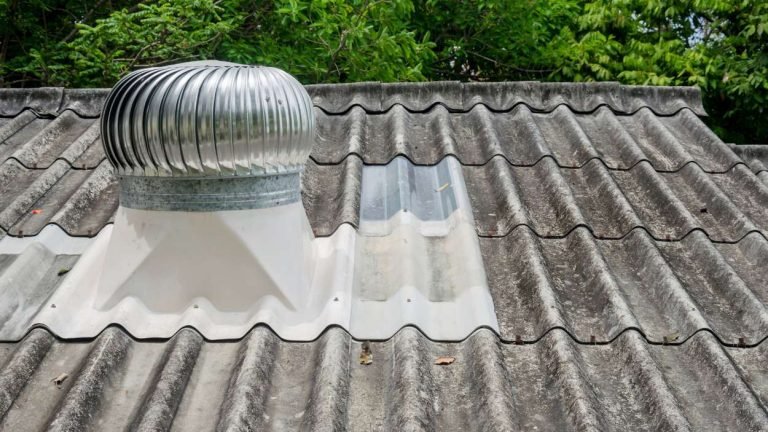
Whirlybirds, also known as roof turbines or wind turbines, are mechanical ventilation devices designed to improve air circulation in attics and roof spaces.
These innovative fixtures consist of a dome-shaped, rotating head with vanes that spin in the wind, creating an updraft that draws hot air and moisture out of the roof cavity.
The primary function of Whirly Birds is to enhance ventilation, offering numerous whirly bird benefits for homeowners:
- Temperature regulation: By expelling hot air, they help maintain cooler temperatures in living spaces.
- Moisture control: Improved airflow reduces condensation and prevents mould growth.
- Energy efficiency: Better ventilation can lead to lower cooling costs in summer.
- Extended roof life: Proper ventilation helps prevent premature aging of roofing materials.
Whirlybirds operate passively, requiring no electricity and minimal maintenance.
Their simple yet effective design makes them a popular choice for ventilation improvement in both residential and commercial buildings.
Available in various sizes and materials, Whirly Birds can be tailored to suit different roof types and ventilation needs, providing a cost-effective solution for enhancing indoor air quality and overall building performance.
Benefits of Whirly Bird Installation
Installing whirly birds offers numerous advantages for homeowners seeking to improve their home’s ventilation and overall comfort. These roof-mounted ventilation devices effectively remove hot air from attic spaces, leading to improved energy efficiency and enhanced home comfort. By facilitating air circulation, whirly birds help regulate indoor temperatures, reducing the strain on cooling systems during warmer months.
The benefits of whirlybird installation include:
- Reduced energy costs through improved thermal regulation
- Prevention of moisture buildup and potential mold growth
- Extended roof lifespan by minimizing heat-related damage
- Improved indoor air quality by removing stale air
- Enhanced overall comfort in living spaces
Whirlybirds operate without electricity, relying on wind power to rotate and expel hot air. This passive ventilation system contributes to long-term energy savings while requiring minimal maintenance.
By creating a cooler attic space, whirly birds help prevent ice dams in winter and reduce the risk of heat-related damage to roofing materials. Additionally, the improved air circulation can help mitigate condensation issues, protecting the structural integrity of the roof and reducing the likelihood of moisture-related problems.
Homeowners can expect to experience more consistent indoor temperatures and improved overall comfort throughout the year, making whirly bird installation a worthwhile investment for many properties.
How Whirly Birds Work
At the heart of whirlybird functionality lies a simple yet effective mechanism that harnesses natural airflow to improve home ventilation. The device consists of a turbine-like structure mounted on the roof, featuring a series of curved vanes or blades that rotate when exposed to wind.
Whirlybird mechanics rely on two key principles:
- Wind-driven rotation: As wind passes over the vanes, it creates a low-pressure area, causing the turbine to spin.
- Convection currents: Hot air rises naturally, creating an upward flow through the whirlybird.
These factors work together to create a continuous cycle of air movement. As the turbine rotates, it draws warm, stale air from the roof space and expels it outside. Simultaneously, this action creates negative pressure within the attic, encouraging cooler air to enter through soffit vents or other lower openings.
The airflow dynamics of whirly birds are influenced by:
- Wind speed and direction
- Roof pitch and orientation
- Surrounding landscape and structures
Types of Whirly Birds
Whirlybirds come in two main varieties: wind-driven and electric models.
Wind-driven whirly birds rely on natural air currents to rotate, while electric models use powered fans for consistent ventilation regardless of weather conditions.
The durability and effectiveness of whirly birds depend largely on their construction materials, with options ranging from galvanized steel and aluminium to UV-resistant polymers.
Wind-Driven vs. Electric Models
When considering whirly birds for home ventilation, homeowners are presented with two main types: wind-driven and electric models.
Wind-driven whirly birds operate solely on the power of natural air currents, making them highly energy-efficient and cost-effective. These models excel in areas with consistent wind patterns, providing continuous ventilation without electricity consumption. However, their performance may vary depending on wind conditions, potentially affecting overall efficiency during calm periods.
Electric whirly birds, on the other hand, utilize motorized fans to guarantee consistent ventilation regardless of wind conditions. These models offer more reliable performance but require electrical power to operate, increasing energy costs. While generally quieter than their wind-driven counterparts, electric whirly birds may produce some noise due to their motorized components.
Key differences between wind-driven and electric whirly birds include:
- Wind efficiency: Wind-driven models are more dependent on natural air currents
- Noise levels: Electric models tend to be quieter overall
- Energy consumption: Wind-driven models require no electricity
- Consistent performance: Electric models provide more reliable ventilation
- Installation complexity: Electric models may require a professional electrical setup
When choosing between wind-driven and electric whirly birds, homeowners should consider their local climate, energy costs, and specific ventilation needs to determine the most suitable option for their property.
Materials and Durability
The durability and performance of whirly birds largely depend on their construction materials. Material choices play an essential role in determining the longevity and efficiency of these ventilation devices. Manufacturers typically use aluminium, galvanized steel, or stainless steel for the main body and components of whirly birds.
| Material | Durability Factors | Maintenance Requirements |
|---|---|---|
| Aluminum | Lightweight, rust-resistant | Low maintenance |
| Galvanized Steel | Sturdy, corrosion-resistant | Periodic inspection |
| Stainless Steel | Highly durable, weather-resistant | Minimal upkeep |
Each material offers unique advantages regarding durability and performance. Aluminium whirly birds are lightweight and resistant to rust, making them ideal for coastal areas. Galvanized steel models provide excellent strength and corrosion resistance, suitable for most climates. Stainless steel options offer superior durability and weather resistance, making them a premium choice for long-term installations.
When selecting a whirlybird, consider the local climate and environmental factors. Coastal regions may benefit from aluminium or stainless steel models due to their resistance to salt air corrosion. In areas with extreme weather conditions, galvanized or stainless steel options may provide better longevity and performance.
Ideal Placement for Whirly Birds
Ideal placement of whirly birds is vital for maximizing their effectiveness in ventilating your roof space. When determining the best locations for whirlybird installation, consider the following factors:
- Roof geometry and pitch
- Prevailing wind direction
- Areas of high heat accumulation
- Existing ventilation features
- Local building codes and regulations
For optimal ventilation, whirly birds should be positioned near the roof’s ridge line, where hot air naturally accumulates. In most cases, installing one whirlybird per 50-70 square meters of roof area is recommended. However, larger roof spaces may require additional units for effective air circulation.
Whirlybird placement should also take into account the direction of prevailing winds to guarantee maximum spin and air extraction. Avoid installing whirly birds in areas shaded by nearby structures or trees, as this can reduce their efficiency.
For homes with multiple roof sections, consider placing whirly birds on each section to guarantee thorough ventilation.
It’s essential to maintain proper spacing between whirly birds to prevent interference and maximize airflow.
Consult with a professional roofing contractor to determine the best number and placement of whirly birds for your specific roof configuration and ventilation needs.
Installation Process Explained
The installation process for Whirly Birds begins with careful roof preparation, guaranteeing a clean and secure surface for mounting.
Positioning these ventilation units strategically is essential for peak airflow, taking into account factors such as roof pitch, prevailing winds, and the layout of your attic space.
Once the ideal locations are determined, professional installers employ secure mounting techniques, including weatherproof sealants and sturdy fasteners, to make certain the whirly birds remain effective and leak-free for years to come.
Roof Preparation Steps
Proper roof preparation is essential for a successful whirlybird installation. Before the installation process begins, a thorough roof inspection and ventilation assessment must be conducted to guarantee the best placement and effectiveness of the whirly birds.
This preparation phase involves several critical steps that contribute to the overall success of the project.
Key roof preparation steps include:
- Cleaning the roof surface to remove debris and provide a clear workspace
- Identifying and addressing any existing roof damage or leaks
- Measuring and marking the precise locations for whirlybird installation
- Verifying the structural integrity of the roof at the chosen installation points
- Confirming proper safety equipment and protocols are in place for the installation team
During the roof inspection, professionals assess the current ventilation system and determine the ideal number and placement of whirlybirds to maximize airflow.
This assessment takes into account factors such as roof pitch, attic space, and existing ventilation features.
Positioning for Optimal Airflow
Following the thorough roof preparation, installers focus on positioning whirly birds for ideal airflow. Understanding airflow dynamics is essential for maximizing ventilation efficiency.
Professionals consider several factors when determining the best placement:
- Roof design: The shape and pitch of the roof influence air movement.
- Wind patterns: Prevailing winds affect the performance of whirly birds.
- Heat accumulation: Areas with higher heat buildup require strategic positioning.
Installers typically place whirly birds near the roof’s ridge, where hot air naturally accumulates. For most residential roofs, spacing whirly birds every 20-30 square meters guarantees adequate coverage. In larger spaces or areas with complex roof designs, additional units may be necessary.
Key considerations for best positioning include:
- Avoiding obstructions: Placing whirly birds away from chimneys, vents, or other roofing features.
- Balancing distribution: Guaranteeing even coverage across the roof area.
- Coordinating with existing ventilation: Complementing soffit vents or other passive ventilation systems.
Secure Mounting Techniques
Once the ideal positions for whirly birds have been determined, secure mounting techniques are essential for guaranteeing long-lasting and effective ventilation. The installation process involves several critical steps to confirm proper function and safety. Roofing professionals employ various mounting methods tailored to different roof types and materials.
To guarantee a successful whirly bird installation, consider the following key aspects:
- Roof penetration and flashing
- Secure fastening to roof structure
- Proper sealing to prevent leaks
- Alignment for maximum wind capture
- Compliance with local building codes
Installation safety is paramount during the mounting process. Technicians must use appropriate personal protective equipment and follow strict safety protocols when working at height.
The mounting base is typically secured to roof trusses or rafters, providing a stable foundation for the whirlybird. Flashing is then carefully installed around the base to create a watertight seal, preventing moisture ingress.
For metal roofs, specialized mounting brackets may be used to accommodate the roofing profile. On tile roofs, tiles are carefully removed and replaced to integrate the whirlybird seamlessly.
Proper installation guarantees that the whirlybird can withstand strong winds and adverse weather conditions while maintaining its ventilation efficiency.
Maintenance Tips for Whirly Birds
Regular maintenance of whirly birds is essential to guarantee their perfect performance and longevity. Implementing a routine whirly bird maintenance schedule guarantees these ventilation devices continue to function efficiently, reducing heat buildup in your roof space and improving overall home comfort.
Regular inspections are vital for identifying potential issues before they escalate into more significant problems.
Key maintenance tasks include:
- Cleaning debris: Remove leaves, twigs, and other materials that may obstruct the whirly bird’s movement.
- Lubricating moving parts: Apply a silicone-based lubricant to facilitate smooth rotation.
- Checking for rust: Inspect metal components for signs of corrosion and address as needed.
- Tightening fasteners: Confirm all screws and bolts are secure to prevent wobbling or detachment.
- Examining seals: Verify that weatherproofing seals are intact to prevent water ingress.
Perform these maintenance tasks at least twice a year, ideally in spring and autumn.
For properties in areas with high debris or severe weather conditions, more frequent inspections may be necessary.
Cost Considerations
When considering the installation of whirlybirds for home ventilation, it’s essential to evaluate both the initial costs and potential long-term savings.
The upfront expenses include the purchase of the whirlybird units and professional installation fees, which can vary depending on the number of units required and the complexity of your roof structure.
However, these initial investments often lead to significant energy savings over time, as improved ventilation reduces the need for air conditioning and helps prevent moisture-related damage to your home’s structure.
Initial Installation Expenses
The initial installation expenses for whirly birds can vary depending on several factors. When planning your initial budget and installation timeline, it’s crucial to take into account the following elements that contribute to the overall cost:
- Number of units required for ideal ventilation
- Type and quality of whirly birds chosen
- Complexity of roof structure and accessibility
- Labour costs for professional installation
- Additional materials needed for proper fitting
Typically, the cost of a single whirly bird unit ranges from $50 to $300, not including installation. Professional installation can add another $100 to $500 per unit, depending on the roof’s complexity and local labour rates.
For a standard-sized home, homeowners should budget for 2-4 whirly birds to achieve effective ventilation.
The installation timeline generally spans 1-2 days, depending on the number of units and roof accessibility. Factors such as weather conditions and the need for additional roof repairs can extend this timeline.
It’s advisable to obtain multiple quotes from reputable contractors to guarantee competitive pricing and a realistic installation schedule. By carefully evaluating these initial installation expenses, homeowners can make informed decisions about incorporating whirly birds into their ventilation strategy.
Long-Term Energy Savings
While initial installation costs are important to contemplate, homeowners should also evaluate the long-term energy savings associated with whirly birds. These roof ventilation systems contribute considerably to energy efficiency and cost reduction over time. By effectively removing hot air from the attic space, whirly birds reduce the strain on air conditioning systems, leading to lower electricity bills during the summer months.
To illustrate the potential savings, consider the following table:
| Year | Energy Savings ($) | Cumulative Savings ($) | ROI (%) |
|---|---|---|---|
| 1 | 120 | 120 | 24 |
| 2 | 125 | 245 | 49 |
| 3 | 130 | 375 | 75 |
| 4 | 135 | 510 | 102 |
| 5 | 140 | 650 | 130 |
As demonstrated, the energy savings accumulate over time, potentially surpassing the initial installation costs within a few years. Additionally, by maintaining a cooler attic space, whirly birds help extend the lifespan of roofing materials, further contributing to long-term cost savings.
Homeowners should consider these factors when evaluating the overall value and return on investment of installing whirly birds for improved home ventilation.
Energy Savings With Whirly Birds
By improving air circulation and reducing heat buildup in your roof space, whirly birds can contribute greatly to energy savings in your home. These passive ventilation devices work tirelessly to expel hot air from your attic, resulting in a cooler living environment and reduced reliance on air conditioning systems.
The energy efficiency gained through ventilation improvement can lead to significant cost savings on your utility bills over time. Much like productive morning routines can set the tone for a successful day, installing whirly birds can set the foundation for a more energy-efficient home.
Whirlybirds offer several benefits that contribute to energy savings:
- Reduced workload on air conditioning systems
- Lower indoor temperatures during hot weather
- Decreased moisture buildup, preventing mould growth
- Extended lifespan of roofing materials
- Improved overall home energy efficiency
The installation of whirlybirds is a cost-effective solution for homeowners looking to enhance their property’s energy performance. By maintaining a cooler attic space, these devices help regulate indoor temperatures more effectively, reducing the need for constant air conditioning.
This not only leads to immediate energy savings but also contributes to the long-term sustainability of your home. Additionally, the improved ventilation helps prevent moisture-related issues, further protecting your property and potentially avoiding costly repairs in the future.
Choosing the Right Whirly Bird
When selecting a whirlybird for your home, several factors must be considered to guarantee maximum performance and efficiency. The size and type of whirlybird play an essential role in its effectiveness. Larger models are typically more suitable for spacious attics, while smaller units work well in compact spaces.
Key whirly bird features to evaluate include:
- Wind-driven turbine design
- Corrosion-resistant materials
- Weatherproof construction
- Noise-reduction technology
Installation guidelines are equally important. Proper placement and quantity of whirly birds depend on your roof’s size and pitch. Generally, one whirlybird per 50-70 square meters of attic space is recommended. However, homes in hotter climates or with poor existing ventilation may require more units.
Consider the following when planning installation:
- Roof material compatibility
- Local building codes and regulations
- Professional assessment of your home’s ventilation needs
Choosing a high-quality whirly bird and adhering to correct installation practices guarantees ideal performance. By carefully evaluating these factors, homeowners can make an informed decision that maximizes the benefits of improved attic ventilation, leading to enhanced energy efficiency and prolonged roof life.
Frequently Asked Questions
Can Whirly Birds Be Installed on Metal Roofs?
Yes, whirly birds can be installed on metal roofs. However, there are specific installation considerations to guarantee proper compatibility with metal roofing materials. Professional installation is recommended to maintain the roof’s integrity and maximize ventilation benefits.
Do Whirly Birds Make Noise During Windy Conditions?
Studies show that properly installed whirly birds are 98% noise-free. While whirlybird noise during windy conditions is minimal, some models may produce a slight hum. Regular maintenance guarantees peak performance and reduces any potential sound issues.
How Many Whirly Birds Are Needed for an Average-Sized Home?
The number of whirlybirds needed for an average-sized home depends on various factors. Generally, one whirly bird can effectively ventilate approximately 50-70 square meters of roof space. For ideal performance, consider the whirlybird capacity and your specific home size.
Are Whirly Birds Effective in Areas With High Humidity?
Whirlybirds can be effective in high-humidity areas, as they promote air circulation and reduce moisture buildup. Their ventilation efficiency helps mitigate humidity impact by expelling warm, moist air from the roof space, potentially improving indoor comfort.
Can Whirly Birds Help Reduce Mold Growth in Attics?
Yes, whirly birds can help reduce mould growth in attics. By improving attic ventilation, they decrease moisture levels and regulate temperature, creating an environment less conducive to mould growth. This effective mould prevention strategy enhances overall indoor air quality.
Final Thoughts
In an ironic twist, the humble whirly bird, often overlooked and underappreciated, emerges as a powerful ally in the quest for ideal home ventilation. While homeowners may fixate on flashy HVAC systems, these unassuming rooftop devices quietly revolutionize indoor air quality and energy efficiency.
As climate concerns intensify, the whirly bird’s simple yet effective design proves that sometimes, the most impactful solutions are hiding in plain sight. By embracing these often-neglected ventilators, homeowners can achieve a cooler, healthier living space while unwittingly becoming eco-warriors.